Chloe and Isabel

I SPY on C+I: the interview!

August 2, 2012

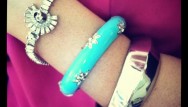
This week we’re trading in our scissors and hot glue gun for a little old fashioned-fashion post! Check out Jenni modeling her exclusive I SPY for C+I bracelet along with one of her fave C+I bangle sets. I SPY is in the hot seat answering our questions about what inspires her and of course, why she hearts Chloe + Isabel. Oh yea-and she’s got some advice for all your budding Tastemakers on how to get started in the business of DIY!

Describe your style in 3 words…Eclectic Girl Next Door (ooops that’s 4 words)

What initially drew you to C+I jewelry? I am a big fan of the story behind the brand. I often feel like I have two different style esthetics — a la Chloe and Isabel. I lean one way or another depending on my mood. Some days I am a little edgier and others I am super girly, but I love those pieces of jewelry that go with everything and C+I def has styles to fit my many style moods.

What was the inspiration behind the combo/pairing of this look? Why did you choose our silver textured bangle set to style with your design? I started with a basic outfit because I was running around the city all day, but some fun add ons to pull it together. I just added fringe to this scarf so decided that would be my statement piece. From there I wanted to keep the accessories neutral, so I mixed my I Spy x c+i bracelet with two silver bangles. My favorite thing about our bracelet collab is the mixing of metals, this way all your add on can be gold or silver!

What advice do you have for girls that are interested in getting into the DIY world? Start small with projects like adding embellishment to shirt or making a bracelet, once you learn the skills and build your confidence, move on to more difficult projects. I promise you, once you get your first compliment, and you get to tell someone you did it yourself, you will be addicted to DIY!

Are you rockin’ your Ltd Ed. wrap bracelet yet? What are you waiting for?
Check back next week for more with Jenni Radosevich!
, , , , , , , , , ,

Comments

Guest Blog: I SPY DIY…#2

July 27, 2012

DIY Jar Jewel Box

It’s here…the 2nd post in our series of projects from I SPY DIY’s Jenni Radosevich. Today, our fave DIY Darling shows us how to paint + glue our way to a super-easy adorable jewelry box.

————-

In my last post I was definitely not shy about my excitement for my collaboration with Chloe + Isabel! Part of our collab is a series DIY posts from yours truly.

The bracelets displayed in this post alongside my limited edition wrap bracelet are from C+I’s fall collection available in mid-August. Start your wish list now and book a trunk show…there are some definite stunners!

Now that you’ve got my bracelet, you’re going to need a place to store it — that is, when your not rockin’ it out and about. If you’re like me, your jewelry collection is ever-growing! Bracelets are hands down my favorite DIY projects to make and, with stacks of them mounting (on my wrists and on atop my dresser) I was in need of a chic space to store them. With a few household items, everyone’s fave garage sale find - the coveted mason jar - and a handful of clothes pins, I created a container to hold my collection of wrist action!

What you’ll need…

Clothespins
Paintbrush
White Acrylic paint
Mason Jar

What to do…

1. Paint the front of each clothespin with your white paint, let dry
2. Line the edge of the top of your mason jar with the clothespins
3. Store your bracelets

Whether you are a C+I Merchandiser or simply an all-around jewelry lover, this is a lovely little container to display + hold all your baubles!

Stay tuned over the next few weeks for more DIY’s to display your fab C+I jewelry!
xo, Jenni
, , , , , , , , , , , ,

Comments

Guest Blogger: I SPY DIY!

July 17, 2012

Hang-on DIY Jewelry Holder

In the first of a series of guest posts from I SPY DIY’s Jenni Radosevich, our fave DIY Darling shows us how to hang up what else, gorge gems!

When I teamed up with C+I to design and sell my limited edition wrap bracelet, I immediately started brainstorming about my guest blog posts. With my growing jewelry collection, including my I Spy x C+I bracelet, I wanted to put a shabby chic DIY spin on a necklace/bracelet holder that would also decorate a bare wall. With paint and eye hooks, I was able to turn an inexpensive hanger into a piece that serves fashion and function! Follow the short steps below and you will be on your way to a shabby chic stunner. Jewelry not included but available here

What you’ll need…

Hanger
13 Eye hooks
White Acrylic paint
Silver Acrylic paint
2 sponges
Paint brush

What to do…

First using the sponge, paint your hanger with the silver paint, then let dry.
Next, using the brush cover your hanger with one layer of crackle medium, let dry.
Then paint over the crackle medium with one thin later of white paint using the second sponge,
and crackles will appear while drying.
When dry, screw in the eye hooks, use a pliers if too difficult to do by hand.
To make sure they evenly spaced mark using a pencil and ruler.
Lastly, hang your necklaces and bracelets! Voila, a gorge DIY jewelry holder.

This project is perfect to display jewels at trunk shows, gift to your bestie or keep all to yourself!

Stay tuned over the next few weeks for more DIY’s to display your fab C+I jewelry!
xo, Jenni
, , , , , , , , , , ,

Comments

Next Page »
Feedback Form